
Recently there has been a ton of interest in the Hyper-V N1k running on Nutanix. This post goes through what is needed to get this working. For a general Hyper-V quickstart guide check out this Cisco doc. I wrote it during my time as TAC engineer there, and it covers most of what you need to know (some things changed in 2012R2 but the general post is there).
In a nutshell, the Nexus 1000v is a virtual switch that replaces the default switch in Hyper-V or ESXi. It utilizes a NXOS base (the same code that makes the Nexus product line work) and gives switching teams a familiar view in to the virtualized environment. You also get the benefits of logical switches (namely unified configuration across your hosts).
Directly from Cisco - at the time of writing this SM1(5.2b) is the newest
What does it cost?
The essentials version is free and covers most basic features you need - you just need to pay for support. This is what I'll be installing. Talk to you Cisco account team for more info on the differences and costs.
What do I need on the Hyper-v Side?
Same requirements as the Nutanix Cluster:
-Windows Server 2012 R2 (Nutanix only supports R2, the n1k supports 2012 SP1 as well)
-System Center Virtual Machine Manager (SCVMM) R2
-Active Directory/DNS
Cisco doesn't recommend/support running the VSM behind the VEM, so please only follow this if you've got another management cluster or a 1010 (otherwise you could run into availability problems)


In a nutshell, the Nexus 1000v is a virtual switch that replaces the default switch in Hyper-V or ESXi. It utilizes a NXOS base (the same code that makes the Nexus product line work) and gives switching teams a familiar view in to the virtualized environment. You also get the benefits of logical switches (namely unified configuration across your hosts).
Getting Started
Where can I get the N1k for Hyper-V?Directly from Cisco - at the time of writing this SM1(5.2b) is the newest
What does it cost?
The essentials version is free and covers most basic features you need - you just need to pay for support. This is what I'll be installing. Talk to you Cisco account team for more info on the differences and costs.
What do I need on the Hyper-v Side?
Same requirements as the Nutanix Cluster:
-Windows Server 2012 R2 (Nutanix only supports R2, the n1k supports 2012 SP1 as well)
-System Center Virtual Machine Manager (SCVMM) R2
-Active Directory/DNS
Cisco doesn't recommend/support running the VSM behind the VEM, so please only follow this if you've got another management cluster or a 1010 (otherwise you could run into availability problems)
SCVMM Configuration
This section needs to be done only once on the SCVMM server, no matter how many N1ks you are installing (as long as they are all the same version).
Install the SCVMM Provider
This is a program located at:
Nexus1000V.5.2.1.SM1.5.2b.zip\Nexus1000V.5.2.1.SM1.5.2b\VMM
Copy this over to the SCVMM server and run this MSI to install it. This is needed to talk between the n1k and SCVMM.
Add the VEM to the repository
Copy the VEM located in Nexus1000V.5.2.1.SM1.5.2b.zip\Nexus1000V.5.2.1.SM1.5.2b\VEM to the SCVMM server. On the SCVMM server place the VEM executable in %ALLUSERSPROFILE%\Switch Extension Drivers
This will be automatically installed when you add the Host to the switch. No need to manually install it.
Copy the install ISO over to a library server
The ISO is located at
Nexus1000V.5.2.1.SM1.5.2b.zip\Nexus1000V.5.2.1.SM1.5.2b\VSM\install
At this point you're ready to start installing VSMs!
VSM Installation
Create a new VM with the following settings:
1 CPU
4 GB RAM
1 4GB fixed disk
3 Network adapters (control/management/packet) connected to a VM network
VSM ISO mounted
Highly Available (if placing on cluster storage)
Once that is done, boot the VM. It will go through and automatically install itself. Wait until you see this screen:
At this point you can now go through the initial configuration of the n1k. Once you are done with the wizard you can login using admin and the pw you set:
Now it's time to configure the system.
Nexus 1000v Configuration
Let's talk about the different components of the Hyper-V N1k. This section is taken from the quickstart guide on Cisco.com
Logical Network - A logical network is a general bucket that contains a certain network. For example, DMZ would be a logical network and Production would be another.
Segment Pool - A collection of segments that belongs to a logical network. For example, they might be for different sites, such as one pool for RTP, and one pool for SJ.
Segment - This is where the access capabilities of a network are defined. This is where you assign VLANs.
Port-Profiles - A collection of policies, not connectivity. Quality of Service (QoS), Access Control List (ACL) and others belong here.
IP Pool - This gets assigned to a segment. In most cases it does not matter. But, when doing orchestration, SCVMM can automatically assign addresses from this pool.
Ethernet - This is an uplink from the host. Each set of uplinks allows a certain segment pool.
vEthernet - This is the interface of a VM. It inherits a port-profile for its policies and a segment for its VLAN.
VMnetwork - This is the segment combined with the IP pool on the SCVMM side.
Port-Classification - This refers to the port-profile policies in SCVMM.
Here is a diagram that explains the inheritance chain:
Now let's build a basic configuration for our N1k. I'm only going to use 1 VLAN for now, however you can add more segments to get the extra VLANs
Create an IP pool for your VLAN. These are the IPs that you assign to your VMs. This needs to be defined for each segment (Hyper-V will use this for static address assignment)
nsm ip pool template hosts
ip address 10.63.4.2 10.63.5.254
network 10.63.4.0 255.255.254.0
default-router 10.63.4.1
dns-server 10.63.1.101
dns-suffix sre.local
Create a logical network. You only need one logical network unless you have something like a DMZ.
nsm logical network rtp-lab
Create a network segment pool. Make it a member of the logical network.
nsm network segment pool rtp-pool
member-of logical network rtp-lab
Create multiple segments, one for each access VLAN. Publish it to SCVMM. If this segment is used for Management, Cluster traffic, or CVM traffic make it a system network segment
nsm network segment host-seg
member-of network segment pool rtp-pool
switchport mode access
switchport access vlan 3004
system network segment
ip pool import template hosts
publish network segment
Create a port-profile for the VMs. There is no need to access a VLAN here. Remember that the port-profile is simply a collection of policies, but the most important one is the "no shutdown"
port-profile type vethernet defaultAccess
no shutdown
state enabled
publish port-profile
Create a Network Segmentation Manager (NSM) uplink. The allow network segment pool command tells SVCMM that these segments are allowed out this uplink. This is needed for the host in order to see your segments. This should match your upstream configuration, so if you have a native VLAN upstream use the command "native network segment xxxx" to set that access segment as native on the uplinks.
If this uplink will carry management, cluster, or CVM traffic make it a system network uplink.
nsm network uplink rtp-uplink
import port-profile uplink_network_default_policy
system network uplink
allow network segment pool rtp-pool
native network segment host-seg
publish network uplink
Modify the created port-profile with any needed policies, such as port-channels.
port-profile type Ethernet rtp-uplink
channel-group auto mode on mac-pinning
This gets us started with a basic config. Change the names/vlans to match your network and naming scheme.
A note on System Network Segments/Uplinks
A system network segment or uplink is used to specify connectivity that is needed to bring the cluster online. When the host is booting up, the host will only bring online the system segments until it can reach the VSM, thus any segment that is needed to communicate between the VSM and the Host should be system.
Management, Cluster, and CVM traffic should all be system segments.
SCVMM Configuration
Now that we've got a basic configuration on the N1k, time to integrate it into SCVMM!


Create a Network Service to connect to the N1k
This is the Hyper-V equivalent of a SVS Connetion
if you don't see the Nexus1000v here, make sure you installed the Provider .msi on the SCVMM server
This is a login account for the VSM. Make sure that you have network-admin access with this account (I used the local admin here)
This specifies how SCVMM will connect to the VSM, so it should be http://[VSM IP]
In later steps, if you don't see something you configured on the N1k make sure to refresh this network service extension.
Create the Logical Switch
Now that we've told SCVMM how to pull data from the N1k we can configure the logical switch we are going to use.
Make sure to choose the N1k extension here. This will tell SCVMM to send the traffic to the n1k
Create a new port-classification and set it as default
This is the port-classification wizard. This shows you how to choose the port-profile we created above
Use the "add" button to select the uplink we created above. Always set the mode to "team"
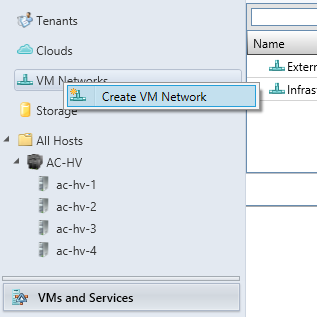
Create the VM Networks based off the Segments
You will need to repeat this once per segment created on the n1k.
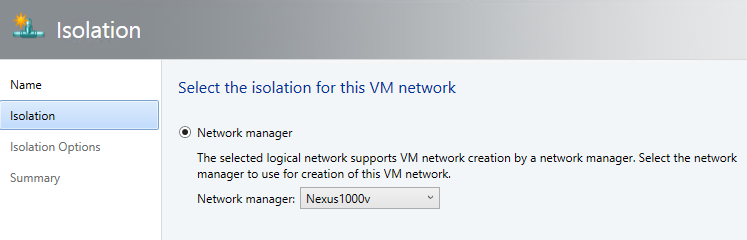
Make sure to choose the logical network you configured on the n1k
If you don't see the Nexus 1000v here, go back and change the logical network
Choose the segment name you configured on the n1k
Adding hosts to the N1k
Now that we have all the SCVMM constructs created, we can add hosts. Here's the procedure we will follow:
1) Remove one NIC from the network team
2) Add this NIC to the N1k. At this point the VEM module will come online.
3) Create a temporary vEth on the N1k for Hyper-V Manager
4) Move all VMs over (including the CVM)
5) Remove the ExternalSwitch from Hyper-V (leave Internal Switch alone!)
6) Create a new vEth on the N1k, give this the IP from ExternalSwitch (so that it matches what it was before, otherwise genesis will have problems)
7) Delete the temp adapter
8) Delete the NIC Team and move the second interface over to the n1k
After this you will be running fully on the n1k! Let's break this down step by step
Using your favorite tool, remove one of the 10gb interfaces from the team. This particular one is from Right-Clicking on the Server in Server manager and choosing "Configure NIC Teaming"
Right-click on the host you are moving and go to virtual switches. Create a new logical switch
Add the adapter you removed from the team and assign it the uplink you created. If you don't see the uplink here, make sure you have configured the logical switch for the uplink under "Fabric"
Add a temporary adapter to the n1k and put it in the appropriate VM Network. Make sure you can reach the host at this address (Ping, RDP, etc.)
At this point you should see the module online. If you do not, make sure the job completed successfully and that you can ping from the host to the VSM.
Now that the module is online you can move the CVM over to the N1k. Right-click on the VM and move it to the appropriate segment. Verify the cluster can reach the CVM as up before continuing. Repeat for each VM on the host. You will need to issue flush the DNS cache on the SCVMM server to reconnect the host (ipconfig /flushdns)
I've combined a few steps here. At this point you can Delete the external switch. After that, Delete the NIC team. Finally come back in here and add the second Ethernet interface to the N1k.
After that, create a new Virtual Network Adapter, name it "ExternalSwitch" and configure it with the IP that it had before. Don't use a different IP or Genesis will not be able to start.
Once you have verified connectivity through this second interface you can delete the TempManagement adapter. Remember to ipconfig /flushdns to reconnect.
Repeat for each host. Once this is finished, congratulations! You're running Nutanix on the N1k!